Unlocking the potential of your camera goes beyond simply pointing and shooting. Mastering your camera’s settings empowers you to capture stunning images, transforming ordinary snapshots into breathtaking works of art. This guide delves into the fundamental settings – aperture, shutter speed, and ISO – explaining their impact on your photos and providing practical tips for various shooting conditions. Whether you’re using a DSLR, mirrorless camera, or even a smartphone, understanding these core elements will significantly elevate your photography.
We’ll explore how to navigate your camera’s menu, adjust exposure for optimal brightness and clarity, and even delve into advanced techniques like white balance and composition. By the end, you’ll possess the knowledge to confidently control your camera and create images that truly reflect your vision.
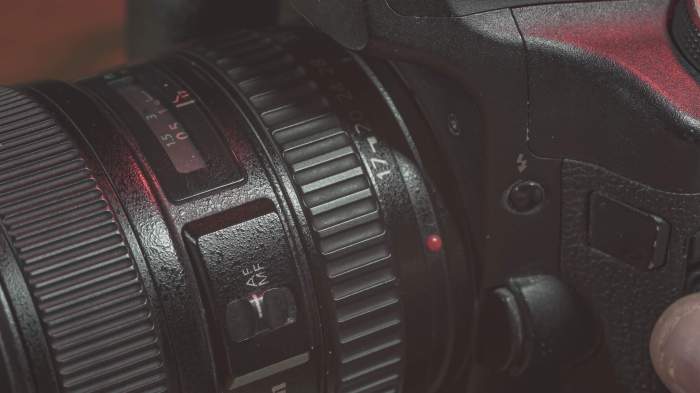
Understanding Your Camera’s Interface

Before you can start taking better photos, you need to understand the basic controls of your camera. This section will cover the fundamental settings – aperture, shutter speed, and ISO – and how to locate and adjust them on different camera types. Mastering these will significantly improve your image quality and creative control.
Aperture, Shutter Speed, and ISO Explained
Aperture, shutter speed, and ISO are the three core elements of the exposure triangle. They work together to determine how much light reaches your camera’s sensor, impacting the brightness and overall look of your photos. Understanding their individual roles is crucial for achieving the desired results.
Aperture: This refers to the size of the opening in the lens diaphragm. It’s measured in f-stops (e.g., f/2.8, f/5.6, f/11). A lower f-stop number (e.g., f/2.8) indicates a wider aperture, letting in more light and creating a shallow depth of field (blurred background). A higher f-stop number (e.g., f/11) means a smaller aperture, letting in less light and resulting in a greater depth of field (more of the image in focus).
On most cameras, the aperture is controlled via a dial or button, often labeled with an “A” or “Av” for aperture priority mode.
Shutter Speed: This determines how long the camera’s sensor is exposed to light. It’s measured in seconds or fractions of a second (e.g., 1/200s, 1s, 30s). A faster shutter speed (e.g., 1/200s) freezes motion, while a slower shutter speed (e.g., 1s) allows motion blur. On most cameras, shutter speed is controlled via a dial or button, often labeled with a “S” or “Tv” for shutter priority mode.
ISO: This measures the sensitivity of your camera’s sensor to light. Lower ISO values (e.g., ISO 100) produce less noise (grain) but require more light. Higher ISO values (e.g., ISO 3200) are more sensitive to light, allowing for shooting in low-light conditions, but introduce more noise. ISO is typically adjusted through a menu or dial on the camera body, often labelled “ISO”.
Location of Settings on Different Camera Types
The location of these settings varies depending on your camera type.
DSLR Cameras (e.g., Canon EOS Rebel T7i): Aperture, shutter speed, and ISO are usually controlled via dials on the camera body. You’ll often find dedicated dials for aperture priority (Av) and shutter priority (Tv) modes, allowing direct adjustment. ISO is typically adjusted through the main menu system or a dedicated button.
Mirrorless Cameras (e.g., Sony a6000): Similar to DSLRs, mirrorless cameras often feature dials for direct aperture and shutter speed control. ISO settings are usually accessed via the main menu or a dedicated button. Many mirrorless cameras also offer touchscreen interfaces, providing additional control options.
Smartphone Cameras: Smartphone cameras typically offer less manual control. While you might find options to adjust ISO and sometimes shutter speed within the camera app, aperture control is usually limited or absent. Many smartphone camera apps provide preset modes (e.g., portrait mode for shallow depth of field) that simulate the effects of aperture adjustments.
Depth of Field and Aperture Settings
The aperture significantly impacts the depth of field.
| Aperture | f-stop | Depth of Field Description | Example Photo Description |
|---|---|---|---|
| Wide Aperture | f/1.4 – f/2.8 | Shallow depth of field; subject in sharp focus, background significantly blurred. | A portrait photo with a sharply focused face, but the background is a soft, out-of-focus blur. |
| Moderate Aperture | f/4 – f/5.6 | Moderate depth of field; subject and some background elements in focus. | A landscape photo where the foreground and mid-ground are sharp, but the distant background is slightly softer. |
| Narrow Aperture | f/8 – f/16 | Large depth of field; most of the image is in sharp focus. | A photo of a cityscape where both the nearby buildings and distant ones are clearly in focus. |
| Very Narrow Aperture | f/22 and beyond | Extremely large depth of field; almost everything is in focus, but diffraction can reduce sharpness. | A highly detailed macro shot of an insect, with both the insect’s body and fine details of its wings in sharp focus. |
Navigating the Canon EOS Rebel T7i Menu System
This step-by-step guide illustrates how to navigate the menu system of a specific camera model. While specific menu options may vary slightly between models, the general process remains similar.
- Access the Menu: Press the Menu button (usually located on the back of the camera).
- Navigate the Menu: Use the multi-controller (a four-way directional pad) to navigate through the various menu tabs. Each tab is typically represented by an icon.
- Select a Setting: Use the multi-controller to highlight the desired setting, then press the Set button (often a central button on the multi-controller) to access its options.
- Adjust the Setting: Use the multi-controller to adjust the value of the setting. Press the Set button to confirm the change.
- Exit the Menu: Press the Menu button again to exit the menu system.
Mastering Exposure Settings

Understanding exposure is fundamental to taking well-lit, high-quality photographs. Exposure refers to the amount of light reaching your camera’s sensor, directly impacting the brightness and overall look of your image. Mastering this involves skillfully manipulating three key settings: aperture, shutter speed, and ISO. These settings interact, and finding the right balance is crucial for achieving your creative vision.
The interplay of aperture, shutter speed, and ISO is often described as the exposure triangle. Each setting affects both the brightness and the overall aesthetic quality of the image. A change in one setting necessitates adjustments in the others to maintain a consistent exposure. For example, increasing the aperture (letting in more light) might require decreasing the shutter speed (reducing the time the sensor is exposed to light) to avoid overexposure.
Similarly, increasing the ISO (making the sensor more sensitive to light) allows for faster shutter speeds or smaller apertures in low-light conditions, but at the cost of potential image noise.
Aperture, Shutter Speed, and ISO Interactions
Let’s examine how different combinations of these settings impact your photos. Consider a scenario where you’re photographing a landscape. A wide aperture (low f-number, e.g., f/2.8) will result in a shallow depth of field, blurring the background and emphasizing the subject. A narrow aperture (high f-number, e.g., f/16) will create a deep depth of field, keeping both the foreground and background in sharp focus.
To maintain the same exposure, a wider aperture will require a faster shutter speed than a narrower aperture. If you’re shooting in bright sunlight, a fast shutter speed (e.g., 1/500th of a second) will freeze motion, while a slower shutter speed (e.g., 1/30th of a second) could introduce motion blur, which might be desirable for artistic effect. Finally, if you are shooting in low light, you might need to increase the ISO (e.g., from ISO 100 to ISO 1600) to compensate for the lack of light, but this can introduce image noise (graininess).
Shooting in Various Lighting Conditions
Different lighting conditions demand different exposure strategies. Bright sunlight often requires fast shutter speeds and possibly smaller apertures or lower ISOs to prevent overexposure. The midday sun can create harsh shadows; using a fill flash or shooting in the shade can help mitigate this. Low-light situations, such as indoor scenes or nighttime photography, necessitate slower shutter speeds, wider apertures, and potentially higher ISOs.
However, higher ISOs increase the risk of noise, so finding a balance between sufficient light and acceptable noise levels is crucial. Using a tripod in low light is highly recommended to avoid blurry images due to camera shake.
Exposure Compensation
Exposure compensation allows you to fine-tune the exposure your camera automatically determines. It’s a useful tool for adjusting the brightness when the camera’s automatic metering system isn’t perfectly accurate, which is often the case with backlit subjects or scenes with high contrast. For example, if your camera underexposes a bright scene, you can use positive exposure compensation to brighten the image.
Conversely, negative exposure compensation darkens an overexposed image. This function is usually accessed via a +/- button on your camera and is measured in stops (e.g., +1 stop, -2 stops).
Automatic vs. Manual Exposure Modes
Automatic exposure modes (like Aperture Priority, Shutter Priority, and Program modes) simplify the process by letting the camera choose one or two settings while you control the others. These are convenient for quick shots, but they may not always produce the exact exposure you envision. Manual mode (M) gives you complete control over aperture, shutter speed, and ISO.
While requiring more understanding of exposure, it provides the greatest creative freedom and allows for precise control over the final image. Choosing between automatic and manual depends on your skill level and desired level of creative control. Automatic modes are great for learning and quick snapshots, while manual mode allows for more artistic expression and mastery over the technical aspects of photography.
Advanced Techniques and Composition
Mastering the basics of exposure is crucial, but truly exceptional photographs require a deeper understanding of advanced techniques and thoughtful composition. This section will delve into strategies that elevate your images from snapshots to works of art. We’ll explore how to control color accuracy, employ powerful compositional tools, and achieve pin-sharp focus every time.
White Balance and Color Accuracy
White balance is the process of adjusting your camera’s settings to ensure that white objects appear white in your photos, regardless of the lighting conditions. Incorrect white balance can lead to images with a color cast—for instance, an outdoor shot might appear too blue on a cloudy day, or an indoor image might look too orange under incandescent lighting.
Your camera offers various pre-set white balance options (e.g., Daylight, Shade, Cloudy, Tungsten, Fluorescent) that you can select to compensate for different light sources. Using the correct setting will result in more natural and accurate colors. Experimenting with these settings and observing the impact on your photos will help you quickly learn which setting works best in various situations.
Many cameras also allow for custom white balance adjustments, offering even finer control.
Compositional Techniques
Effective composition is key to creating visually appealing photographs. Several techniques can dramatically improve your images.
- Rule of Thirds: Instead of centering your subject, position it along imaginary lines that divide your frame into thirds both horizontally and vertically. The intersections of these lines are often considered visually pleasing points of focus. Imagine a tic-tac-toe grid overlaid on your viewfinder or screen; place your subject at one of the intersections for a more dynamic composition. For example, placing a lone tree on the right-hand intersection point, with a vast landscape to the left, can create a sense of scale and intrigue.
- Leading Lines: Use natural lines within the scene, such as roads, rivers, or fences, to guide the viewer’s eye towards your main subject. These lines add depth and create a sense of movement within the image. For example, a winding path leading to a distant mountain peak creates a powerful sense of journey and perspective.
- Symmetry and Patterns: Symmetrical compositions can be incredibly visually striking. Look for repeating patterns or reflections to create a sense of order and balance. For example, a perfectly symmetrical reflection of a building in a calm pond creates a stunning visual impact.
Improving Focus and Sharpness
Sharpness is paramount for a successful photograph. Here are some practical tips to help you achieve consistently sharp images:
- Use a Tripod: A tripod provides stability, eliminating camera shake, particularly in low-light conditions or when using longer shutter speeds.
- Shoot in RAW: RAW files contain more image data than JPEGs, giving you greater flexibility in post-processing to adjust sharpness and other aspects of your image.
- Clean Your Lens: Fingerprints, dust, and other debris on your lens can significantly reduce image sharpness. Regularly clean your lens with a microfiber cloth.
- Use a Faster Shutter Speed: A faster shutter speed minimizes the effects of camera shake and subject movement, resulting in sharper images.
- Stop Down Your Aperture (Higher f-stop): A smaller aperture (higher f-stop number) increases the depth of field, ensuring more of the scene is in focus. However, this also reduces the amount of light entering the camera, potentially requiring a longer shutter speed or higher ISO.
Focusing Modes
Understanding your camera’s focusing modes is crucial for achieving sharp focus. Different modes are best suited for different situations.
- Autofocus (AF): This is the most commonly used mode. The camera automatically selects the focus point and adjusts focus as needed. Several types of autofocus exist, including single-point AF (selecting a specific point), multi-point AF (using multiple points), and AI Servo AF (continuously tracking a moving subject).
- Manual Focus (MF): In manual focus, you manually adjust the focus ring on your lens to achieve sharp focus. This mode offers greater control but requires more practice and is often used for macro photography or specific focusing needs.
End of Discussion

Transforming your photography from snapshots to stunning images is within your reach. By understanding and mastering your camera’s settings, you gain complete control over the creative process. This guide provided the foundation; now, experiment, explore different settings, and discover your unique photographic style. Remember, practice is key to honing your skills and developing your artistic eye. The world is your canvas; go capture it!