Unlocking the full potential of your 3D printer involves mastering its settings. This guide delves into the intricate relationship between slicer parameters and the final product, empowering you to transform digital designs into stunning, precisely crafted physical objects. We’ll explore how adjustments to layer height, infill density, nozzle temperature, and more can dramatically alter the appearance, strength, and overall quality of your prints, allowing you to create truly bespoke designs.
From achieving smooth, glossy surfaces to mastering intricate details and optimizing print speed, we’ll provide a comprehensive overview of techniques and troubleshooting strategies. Whether you’re a seasoned 3D printing enthusiast or a curious beginner, this guide will equip you with the knowledge to elevate your 3D printing projects to a new level of precision and creativity.
Understanding 3D Printer Settings and Their Impact on Designs

Successfully navigating the world of 3D printing hinges on understanding how various slicer settings influence the final product. Mastering these settings allows for precise control over the quality, appearance, and even the structural integrity of your prints. This section delves into the key settings and their effects, empowering you to create truly customized designs.
Slicer Settings and Their Influence on Print Quality
Slicer settings are the parameters you define before initiating a print job. They directly impact the final object’s characteristics. Crucial settings include layer height, infill density, nozzle temperature, and print speed. Layer height determines the resolution of the print; lower layer heights result in smoother, more detailed prints but increase print time. Infill density controls the amount of material used inside the object, affecting its strength and weight.
Nozzle temperature dictates the filament’s fluidity, impacting layer adhesion and surface smoothness. Finally, print speed affects the overall print time and can influence the quality of the print if set too high. A balanced approach is key, optimizing these settings to achieve the desired balance between quality, speed, and material usage.
Infill Patterns and Their Properties
Different infill patterns offer varying degrees of strength, weight, and print time. Rectilinear infill, characterized by straight lines, is simple and fast but may not be as strong as other patterns. Cubic infill creates a more robust structure but increases print time. Honeycomb infill provides a good balance between strength and weight, offering a lightweight yet sturdy structure.
The choice of infill pattern depends heavily on the intended use of the printed object. For a strong, load-bearing part, cubic infill would be preferred. For a lightweight, decorative item, honeycomb infill might be more suitable. Rectilinear infill is a good compromise for general-purpose prints where speed is a priority.
Nozzle Temperature and Filament Adhesion
The nozzle temperature significantly impacts the adhesion and smoothness of printed layers. Too low a temperature leads to poor layer adhesion and a rough surface finish, while too high a temperature can cause stringing (extrusion of filament between layers) and warping (deformation of the print). Finding the optimal temperature for each filament type is crucial.
| Filament Type | Optimal Temperature Range (°C) | Low Temperature Effects | High Temperature Effects |
|---|---|---|---|
| PLA | 180-220 | Poor layer adhesion, rough surface | Stringing, warping |
| ABS | 210-250 | Poor layer adhesion, brittle print | Warping, excessive stringing |
| PETG | 230-260 | Poor layer adhesion, rough surface | Warping, excessive stringing |
Impact of Layer Height on Detail
Consider a hypothetical project: printing a miniature dragon figurine. Using a high layer height (e.g., 0.3mm) will result in a blockier, less detailed dragon. The scales and intricate details of the wings will be less defined, appearing almost smoothed over. Conversely, a low layer height (e.g., 0.1mm) will capture significantly more detail. The scales will be clearly defined, and the delicate features of the wings will be much more prominent.
The difference is akin to comparing a low-resolution image to a high-resolution image – the finer details are only visible at higher resolutions (lower layer heights). The low layer height print would be significantly smoother and more accurate to the original design, although the print time would increase substantially.
Modifying Settings for Specific Design Goals
Fine-tuning your 3D printer settings allows for precise control over the final product, enabling you to achieve specific aesthetic and functional characteristics in your prints. Understanding how each setting interacts with the others is key to consistently producing high-quality results. This section will explore how adjusting key parameters can lead to dramatically different outcomes.
By carefully manipulating settings like layer height, print speed, temperature, and retraction, you can achieve a wide range of surface finishes and dimensional accuracies. The interplay of these settings is often non-linear, meaning a small change in one setting can have a significant effect on the overall result. Experimentation and observation are crucial to mastering this aspect of 3D printing.
Surface Finish Control
Achieving the desired surface finish is a crucial aspect of 3D printing. A smooth, glossy surface might be desired for a functional part, while a textured surface could be more appropriate for an artistic piece. Several settings directly influence the final surface texture. Lower layer heights generally produce smoother surfaces, as the individual layers are less visible.
Increasing the nozzle temperature can lead to a more fused and less layered appearance. Post-processing techniques, such as sanding and polishing, can further enhance the smoothness. Conversely, a rougher texture can be achieved by increasing the layer height, reducing the print temperature slightly, or incorporating intentional surface features into the design itself. Consider using a raft or brim to create a more even base layer and avoid imperfections.
Print Speed and Its Impact on Quality and Accuracy
The print speed significantly affects the overall quality and dimensional accuracy of the printed object. A balance must be struck between speed and precision.
The following points highlight the relationship between print speed and print quality:
- Faster speeds: Can lead to less precise layer adhesion, visible layer lines, warping, and dimensional inaccuracies. The molten filament may not have enough time to fully bond with the previous layer, resulting in a weaker and less aesthetically pleasing print. This is particularly noticeable in complex geometries or with certain materials.
- Slower speeds: Allow for better layer adhesion, smoother surfaces, improved dimensional accuracy, and stronger prints. The extra time provides opportunities for the filament to cool and solidify properly before the next layer is deposited, leading to a more robust and refined final product. However, slower speeds increase print time significantly.
- Optimal Speed: The ideal print speed varies greatly depending on the printer, filament type, and the complexity of the design. Experimentation is crucial to find the sweet spot for your specific setup. Start with a slower speed and gradually increase it until you notice a degradation in quality.
Optimal Settings for Different Object Sizes
Printing small, intricate details requires different settings than printing large, solid objects.
The key differences lie in the resolution and the potential for warping or sagging:
- Small, Intricate Details: Require a lower layer height for higher resolution, slower print speeds for better layer adhesion, and potentially a heated bed to minimize warping. Small nozzles (0.2mm or even smaller) can also improve the detail achievable. Retraction settings need careful consideration to prevent stringing.
- Large, Solid Objects: Can tolerate higher layer heights and faster print speeds, reducing overall print time. The larger surface area can increase the risk of warping, so a heated bed and appropriate adhesion techniques are important. A higher flow rate might be suitable to speed up printing without sacrificing quality too much.
Retraction Settings and Their Effects on Stringing and Oozing
Retraction refers to the process of pulling the filament back into the nozzle during pauses in the print to prevent oozing and stringing.
Different retraction settings produce different results:
- High Retraction: Reduces stringing effectively but may lead to slight gaps between layers or visible retraction marks. It might also increase the risk of nozzle clogging if the retraction distance is excessive.
- Low Retraction: Minimizes the risk of layer gaps and retraction marks but might result in more stringing or oozing, particularly in complex prints with many changes in direction. It might also require more post-processing to remove excess filament.
- Optimal Retraction: Finding the optimal retraction distance and speed requires experimentation. The goal is to minimize stringing without introducing significant layer defects. The ideal setting is highly dependent on the filament type, nozzle size, and printer model.
Advanced Techniques and Customization
Mastering 3D printing involves not only understanding the basic settings but also delving into advanced techniques that refine print quality and expand creative possibilities. This section explores calibration, support structure utilization, custom profile creation, and common troubleshooting strategies.
Printer Calibration for Accurate Prints
Precise calibration is crucial for consistent and accurate 3D prints. Inaccurate calibration can lead to dimensional inaccuracies, warping, and other print defects. The process generally involves adjusting several key parameters to ensure the printer’s mechanics function optimally. This includes bed leveling, extruder calibration, and nozzle temperature adjustments. Proper calibration ensures the printer lays down filament correctly, leading to high-quality prints.
Effective Use of Support Structures
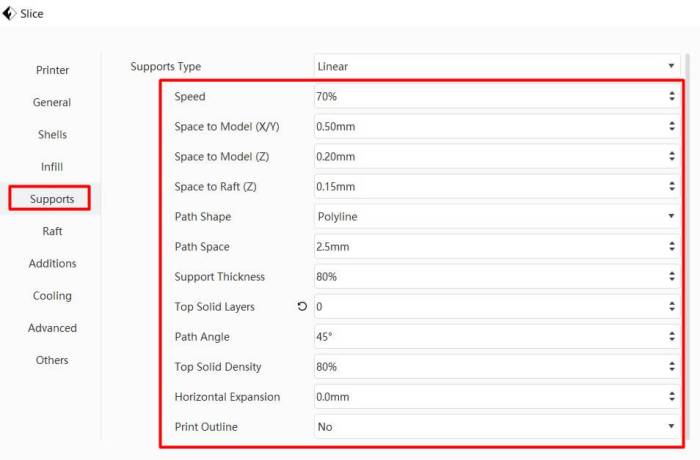
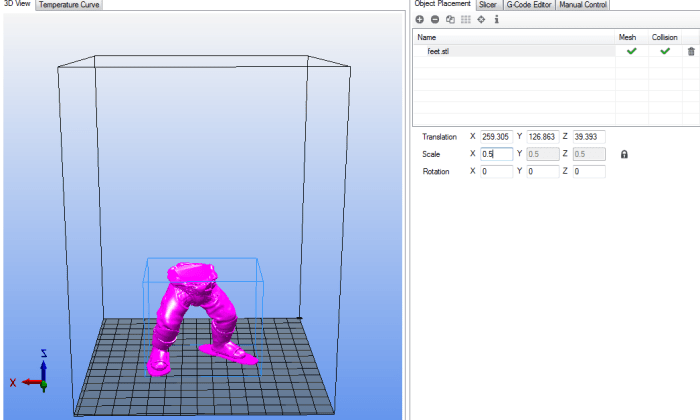
Support structures are essential for printing parts with overhangs or complex geometries that would otherwise collapse during printing. Different types of support exist, each suited for specific needs. Choosing the appropriate support type and its density is crucial for successful printing.
- Assess the model: Identify areas requiring support based on overhang angles and intricate details.
- Select support type: Choose from tree supports (minimal contact, easy removal), grid supports (stronger, denser), or custom supports (for complex geometries). Consider the material and print orientation.
- Adjust support density: A higher density provides stronger support but may require more post-processing effort for removal. Experiment to find the optimal balance between strength and ease of removal.
- Configure support settings: Adjust settings within your slicer software to control support pattern, contact area, and placement.
- Test and iterate: Print a test part to evaluate the effectiveness of the chosen support settings. Refine the settings as needed.
Utilizing Custom Profiles in Slicer Software
Slicer software allows saving frequently used settings as custom profiles, streamlining the printing process. This eliminates the need to repeatedly enter the same parameters for similar materials or print types. Profiles can be created and saved for different filaments, print speeds, infill densities, and other settings.
Troubleshooting Common 3D Printing Issues
Several common issues can hinder successful 3D printing. Warpage, often caused by insufficient bed adhesion or uneven heating, can be addressed by improving bed adhesion with gluesticks, hairspray, or heated beds. Adhesion problems are typically solved by cleaning the print bed thoroughly, ensuring proper bed leveling, and adjusting the nozzle temperature. Layer shifting, characterized by layers not aligning correctly, is often due to loose belts or insufficient motor power, requiring belt tightening or motor adjustments. Each issue requires a systematic approach to identify the root cause and implement the appropriate solution.
Last Word

Mastering 3D printer settings is a journey of experimentation and refinement. By understanding the interplay between various parameters and their impact on your prints, you gain the power to translate your vision into reality with exceptional accuracy and detail. This guide has provided a foundation for this process, equipping you with the knowledge to troubleshoot common issues and consistently produce high-quality, custom-designed 3D prints.
Continue exploring, experimenting, and pushing the boundaries of what’s possible with your 3D printer.