Achieving clear, crisp audio is crucial for effective communication and high-quality recordings. Whether you’re participating in online meetings, recording podcasts, or streaming games, understanding how to optimize your microphone settings is key. This guide provides a comprehensive walkthrough, covering everything from basic system settings to advanced audio processing techniques, ensuring your voice is heard loud and clear.
We’ll explore how to identify your microphone and access its settings across different operating systems, adjust input levels and reduce background noise, and even delve into the nuances of sample rate and bit depth. Furthermore, we’ll discuss advanced techniques using audio software and different microphone types, empowering you to produce professional-sounding audio regardless of your technical expertise.
Identifying Your Microphone and System Settings
Understanding your microphone and its settings is crucial for achieving optimal audio quality. This involves identifying your microphone hardware, locating the relevant system settings, and adjusting parameters like input level and sample rate. This section will guide you through this process on different operating systems.
Locating Microphone Settings in Different Operating Systems
Finding your microphone settings varies slightly depending on your operating system. Below, we Artikel the steps for Windows, macOS, and Linux.
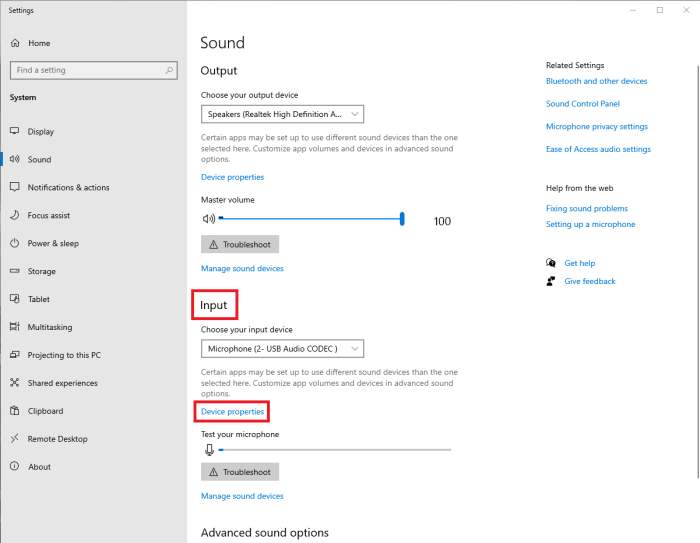
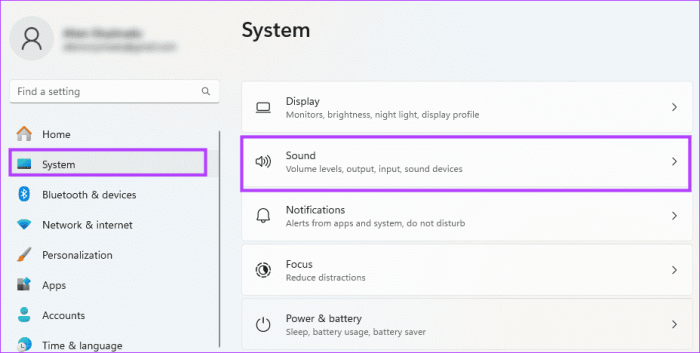
Windows: Generally, accessing microphone settings in Windows involves searching for “Sound settings” in the start menu. This opens the Sound control panel, where you can select your microphone as the default input device and adjust its properties. You might also find microphone-specific settings within the app you’re using (like Zoom or Discord).
macOS: On macOS, navigate to System Preferences (usually found in the Apple menu) and then click on “Sound.” The “Input” tab allows you to select your microphone and adjust its input volume. Similar to Windows, individual applications may also offer their own microphone controls.
Linux: The method for accessing microphone settings varies greatly depending on the specific Linux distribution and desktop environment (GNOME, KDE, XFCE, etc.). However, you’ll typically find sound settings within your system settings application. Look for options related to “Sound,” “Audio,” or “Multimedia.” The exact location and interface will differ across distributions.
Microphone Options and Their Functions
Different operating systems provide various options for configuring your microphone. Understanding these options allows for fine-tuning audio input. These options commonly include:
Input Device Selection: This allows you to choose which microphone your system uses as the primary audio input. You might have multiple microphones connected (built-in, USB, etc.).
Input Volume/Gain: This controls the sensitivity of your microphone. Increasing the gain amplifies the sound, while decreasing it reduces it. Careful adjustment prevents clipping (distortion from excessively loud signals) or low volume.
Sample Rate: This determines how many audio samples are recorded per second. Higher sample rates generally result in better audio quality but require more processing power and storage space. Common rates include 44.1 kHz (CD quality) and 48 kHz (common for high-quality audio).
Bit Depth: This represents the precision of each audio sample. Higher bit depths (e.g., 16-bit, 24-bit) offer greater dynamic range and detail but also increase file size.
Microphone Enhancements: Some systems offer features like noise reduction, echo cancellation, or automatic gain control. These can significantly improve audio clarity, especially in noisy environments.
Default Microphone Settings Comparison
The following table compares default microphone settings across Windows, macOS, and Linux. Note that these values can vary depending on the specific hardware and software configuration.
| OS | Default Input Device | Default Sample Rate (kHz) | Default Bit Depth (bits) |
|---|---|---|---|
| Windows 10/11 | System Default (varies by hardware) | 44.1 or 48 (varies by hardware and application) | 16 |
| macOS (Monterey and later) | Internal Microphone (if available), otherwise the first detected input device. | 44.1 or 48 (varies by hardware and application) | 16 |
| Linux (varies greatly by distribution and desktop environment) | Varies greatly; often the first detected input device. | 44.1 or 48 (varies greatly) | 16 |
Adjusting Microphone Properties for Optimal Sound

Optimizing your microphone settings is crucial for achieving clear and professional-sounding audio. This involves carefully managing input levels, minimizing background noise, and selecting appropriate sample rates and bit depths. By understanding and adjusting these parameters, you can significantly improve the overall quality of your recordings and communication.
Microphone Input Volume Levels
Properly setting your microphone input volume is paramount to avoid clipping (distorted audio from overly loud signals) and excessive background noise (from overly sensitive settings). Different applications often have their own volume controls. For instance, in a video conferencing program like Zoom, you’ll find a slider to adjust the microphone input level; Windows’ Sound settings offer a system-wide volume control affecting all applications.
It’s best practice to adjust the volume to a level where your voice is clearly audible without distortion, leaving some headroom to avoid clipping during louder passages. Experiment with different levels, monitoring the audio output to find the optimal setting.
Reducing Background Noise
Background noise can significantly detract from audio quality. Fortunately, many operating systems and applications include built-in noise reduction tools. Windows, for example, often provides noise suppression options within its sound settings. Similarly, many communication and recording software applications offer noise gates or noise reduction filters. These tools work by identifying and attenuating consistent background sounds, allowing your voice to stand out more clearly.
Experiment with different noise reduction settings to find a balance between noise reduction and preserving the natural sound of your voice. Overly aggressive noise reduction can sometimes make your voice sound unnatural or muffled.
Microphone Sample Rate and Bit Depth
The sample rate and bit depth determine the fidelity of your audio recording. The sample rate measures how many audio samples are taken per second (measured in Hertz, or Hz). A higher sample rate generally captures more audio detail. Common sample rates include 44.1 kHz (CD quality), 48 kHz (standard for many digital audio workstations), and higher rates like 96 kHz or 192 kHz used for professional applications or mastering.
Bit depth refers to the number of bits used to represent each audio sample. A higher bit depth (e.g., 24-bit) provides a greater dynamic range and reduces quantization noise, resulting in a cleaner and more detailed sound compared to a lower bit depth (e.g., 16-bit). For example, a 44.1 kHz/16-bit recording will sound noticeably different from a 48 kHz/24-bit recording, with the latter offering superior clarity and detail.
The choice of sample rate and bit depth depends on the intended use of the audio; high-fidelity applications such as music production benefit from higher settings, while lower settings may suffice for everyday use like video conferencing.
Troubleshooting Microphone Issues Using Built-in OS Tools
A flowchart illustrating the process:[Imagine a flowchart here. The flowchart would begin with a “Microphone Problem?” decision box. If yes, it would branch to “Check Microphone Connections,” then to “Check Microphone Input Volume,” then to “Check for Conflicting Applications,” then to “Try Different USB Port (if applicable),” then to “Check Device Manager for Errors (Windows),” then to “Update/Reinstall Drivers,” and finally to “Contact Manufacturer/Seek Professional Help.” If the initial answer was “No,” the flowchart would end.]
Advanced Microphone Techniques and Software

Optimizing your microphone setup goes beyond basic settings. This section delves into advanced techniques and software to significantly enhance your audio quality, allowing you to achieve professional-level results. We’ll explore how to leverage audio processing tools and understand the nuances of different microphone types to best suit your recording needs.
Equalization and Compression in Audio Software
Equalization (EQ) and compression are powerful tools within audio editing software that can dramatically improve the clarity and overall sound of your microphone recordings. EQ allows you to adjust the balance of different frequencies, boosting or cutting specific ranges to address issues like muddiness in the low-end or harshness in the high-end. Compression reduces the dynamic range of your audio, making quieter sounds louder and louder sounds softer, resulting in a more consistent and professional sound.
For example, a vocalist with inconsistent volume throughout a song can benefit greatly from compression, evening out their performance. Similarly, a noisy recording environment can be improved with EQ, cutting out specific frequency ranges where the noise is most prominent. Effective use of both EQ and compression requires practice and an understanding of audio frequencies, but the results can be transformative.
Microphone Types and Recording Environments
Different microphone types are suited to different recording environments and applications. Dynamic microphones are robust, handle high sound pressure levels well, and are less susceptible to handling noise. This makes them ideal for live performances or loud environments. Condenser microphones, on the other hand, are more sensitive and capture a wider frequency range, producing a clearer and more detailed sound, making them popular for studio recording and voice-overs.
USB microphones combine the convenience of a plug-and-play interface with the sound quality of condenser or dynamic microphones, often including built-in preamps and A/D converters. The choice of microphone significantly impacts your final audio quality. For instance, a dynamic microphone might be preferable for a noisy podcast recording, while a condenser microphone would be better suited for recording a quiet acoustic guitar performance in a controlled studio setting.
Audio Editing Software
Choosing the right audio editing software is crucial for enhancing your microphone recordings. Many options exist, both free and paid, each with its own set of features.
- Audacity (Free): A popular, open-source program offering basic EQ, compression, noise reduction, and other effects. It’s an excellent starting point for beginners.
- GarageBand (Free, macOS/iOS): Apple’s free DAW (Digital Audio Workstation) provides a user-friendly interface with a range of effects, including EQ, compression, and reverb. Ideal for beginners and intermediate users on Apple devices.
- Reaper (Paid): A powerful and highly customizable DAW with advanced features for professional audio editing and mixing, including comprehensive EQ and compression tools. A very versatile option for all skill levels.
- Adobe Audition (Paid): A professional-grade audio editing and restoration suite with extensive tools for noise reduction, EQ, compression, and other advanced effects. Powerful but has a steeper learning curve.
Using a Virtual Audio Cable
A virtual audio cable acts as a bridge, allowing you to route your microphone audio through audio processing software before it reaches your computer’s default audio output. This is particularly useful for applying real-time effects or recording processed audio directly. Popular options include Voicemeeter Banana (free) and ASIO4ALL (free). The process typically involves setting your microphone as the input for the virtual cable in your audio software, then setting the output of your audio processing software to your computer’s speakers or recording device.
This allows for effects like real-time EQ or compression to be applied to your microphone audio before it’s heard or recorded. For instance, you could use Voicemeeter to route your microphone signal through Reaper for compression and EQ, before sending the processed audio to your streaming software.
Summary
By mastering your microphone settings, you can significantly enhance the quality of your audio output. This guide has equipped you with the knowledge to navigate your operating system’s settings, utilize noise reduction tools, and even explore advanced audio processing software. Remember, clear audio is paramount for effective communication and professional recordings. Experiment with the techniques Artikeld here to find the optimal settings for your specific needs and environment, and enjoy the improved sound quality that results.