Transform your Twitch presence with a captivating profile banner! This guide provides a comprehensive walkthrough, from initial design concepts to final upload, empowering you to create a visually stunning banner that perfectly reflects your brand and engages your viewers. We’ll explore design tools, image optimization techniques, and troubleshooting tips, ensuring a seamless and professional upgrade to your Twitch profile.
Learn how to choose the right images, leverage design software effectively, and optimize your banner for optimal performance across various devices. We’ll cover everything from selecting high-resolution images and incorporating text and logos to troubleshooting common upload issues, leaving you with a banner that truly stands out.
Choosing the Right Twitch Banner Image

Your Twitch banner is the first visual impression viewers get of your channel. A well-designed banner can significantly impact your channel’s aesthetic appeal and attract new followers. It’s crucial to choose an image that accurately reflects your brand and the type of content you stream. A poorly chosen banner, conversely, can deter potential viewers.A cohesive theme is key to a successful Twitch banner.
The banner should visually align with your channel’s overall aesthetic, including your profile picture, panels, and stream overlays. This consistency creates a professional and polished look, enhancing your brand identity and making your channel more memorable.
Effective Banner Designs for Different Twitch Categories
The ideal banner design varies significantly depending on your streaming category. A gaming channel will require a different approach than a music or art channel. Consider the following examples:A gaming channel might feature a dynamic image showcasing the game’s key art or a captivating scene from gameplay. For example, a streamer playing a fantasy RPG might use a banner featuring a majestic landscape or a powerful character illustration.
In contrast, a streamer focusing on competitive FPS games could opt for a more aggressive and action-packed banner, perhaps showing a close-up of their character aiming down sights.An art channel could showcase a portfolio of the streamer’s best work, creating a visual representation of their artistic style and skill. This could involve a collage of different pieces, or a single, striking artwork.
The focus should be on high-quality visuals that highlight the artist’s talent.A music channel might use a banner with a visually appealing graphic related to the genre of music they play. This could be an abstract design, a stylized portrait, or a dynamic representation of sound waves. The banner should create a mood that aligns with the music they stream, whether it’s calming and peaceful or energetic and exciting.
High-Resolution Images and Screen Size Considerations
Using high-resolution images is crucial for maintaining visual quality across different screen sizes. Twitch’s banner dimensions are 1920×480 pixels. Uploading a lower-resolution image will result in a blurry and unprofessional-looking banner, especially on larger screens. Aim for an image with a resolution significantly higher than the required dimensions to ensure sharp visuals even when scaled down. This ensures that your banner looks crisp and clear on all devices, from small mobile screens to large desktop monitors.
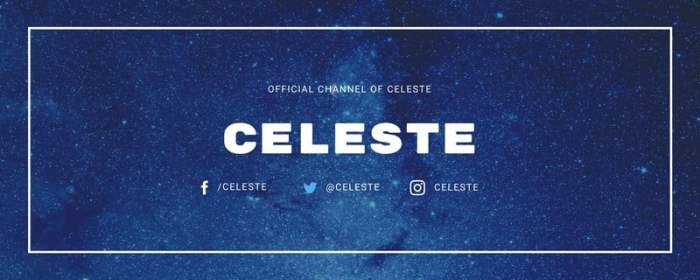
Visually Appealing Graphics and Brand Reflection
Your Twitch banner should be visually appealing and instantly communicate the essence of your channel. Use high-quality graphics, vibrant colors, and clear typography to create a professional and engaging design. Consider your target audience and the overall tone you want to convey. The banner should be consistent with your brand identity, reflecting your personality and the unique value proposition of your channel.
For instance, a streamer known for their comedic gameplay might use a humorous banner, while a streamer focused on educational content might opt for a more serious and informative design.
Resizing Images to Meet Twitch Specifications
Properly resizing your banner image is essential to ensure it displays correctly on Twitch. Incorrect dimensions can lead to a distorted or cropped banner. Here’s a step-by-step guide using common image editing software:
| Step | Action | Details |
|---|---|---|
| 1 | Open Image in Editor | Open your chosen banner image in an image editing program like Photoshop, GIMP, or Canva. |
| 2 | Check Dimensions | Verify the current dimensions of your image. |
| 3 | Resize Image | Use the resize tool to adjust the dimensions to 1920 pixels wide and 480 pixels high. Maintain the aspect ratio to avoid distortion. |
| 4 | Save Image | Save your resized image in a suitable format like PNG or JPG, ensuring high quality. |
| 5 | Upload to Twitch | Upload the saved image to your Twitch profile banner section. |
Utilizing Design Tools and Resources
Creating a professional-looking Twitch banner requires the right tools and resources. Fortunately, many options cater to different skill levels and budgets, from user-friendly online platforms to powerful professional software. Choosing the right tool depends on your design experience and the complexity of your desired banner.Choosing the right design software is crucial for creating a high-quality Twitch banner. The software you select will influence your workflow, the final product’s quality, and the overall time investment.
Graphic Design Software Comparison
Canva and Adobe Photoshop are two popular choices for designing Twitch banners. Canva offers a user-friendly interface with drag-and-drop functionality, making it ideal for beginners. Its extensive library of templates, stock photos, and fonts simplifies the design process significantly. Photoshop, on the other hand, provides a more advanced and versatile toolset, offering greater control over every aspect of the design.
This power comes at the cost of a steeper learning curve and a higher price point. While Canva excels in ease of use and accessibility, Photoshop’s superior capabilities allow for intricate designs and high-resolution outputs. Ultimately, the best choice depends on your skill level and the level of customization you require.
Incorporating Text and Logos
Adding text and logos to your Twitch banner is essential for branding and conveying information. Text should be legible and visually appealing, while logos should be high-resolution and appropriately sized. In Canva, you can easily add text boxes and upload logos, adjusting their size, font, and color with simple drag-and-drop actions. Photoshop offers more advanced text manipulation tools, including layer styles and advanced typography options for creating sophisticated text effects.
When incorporating elements, ensure they are appropriately sized and positioned to maintain a balanced and visually appealing composition, avoiding overcrowding. The text should clearly communicate your Twitch channel’s name and potentially a short, memorable tagline. Logos should be prominently displayed but not overwhelm other design elements.
Creating Visually Appealing Text Overlays
Visually appealing text overlays require careful consideration of typography, color, and placement. Choose fonts that are easily readable even at smaller sizes. High contrast between the text color and the background is crucial for legibility. Experiment with different font styles, sizes, and colors to find a combination that complements your overall design and brand identity. Consider using subtle drop shadows or Artikels to enhance readability and add visual interest.
In Canva, pre-designed text styles can provide a starting point, while Photoshop allows for more extensive customization of text effects, such as gradients, bevels, and embossing.
Free and Paid Resources
Access to high-quality resources significantly enhances banner design. Several free and paid options exist to supplement your design process.
- Free Stock Photos: Unsplash, Pexels, Pixabay offer high-resolution images free for commercial use. These sites provide a vast library of diverse images, allowing you to find visuals that match your brand and banner theme. Remember to check the license for each image to ensure it meets your needs.
- Free Fonts: Google Fonts provides a wide selection of free, open-source fonts suitable for various design projects. These fonts are readily available and easily integrated into most design software.
- Paid Stock Photos: Shutterstock, Adobe Stock offer extensive libraries of high-quality stock photos, but require a subscription or per-image purchase. These often provide more unique and professional images than free options.
- Paid Fonts: Sites like Creative Market and Font Squirrel offer a vast selection of premium fonts. These often have unique styles and are less likely to be used by others, giving your banner a distinctive look. Remember to check the license for commercial use.
Uploading and Optimizing Your Banner on Twitch
Now that you’ve designed your perfect Twitch banner, it’s time to upload it and ensure it looks fantastic across all devices. This section will guide you through the process, offering tips for optimization and troubleshooting potential problems. Properly uploading and optimizing your banner will significantly enhance your Twitch channel’s professional appearance and user experience.
Uploading a New Twitch Banner
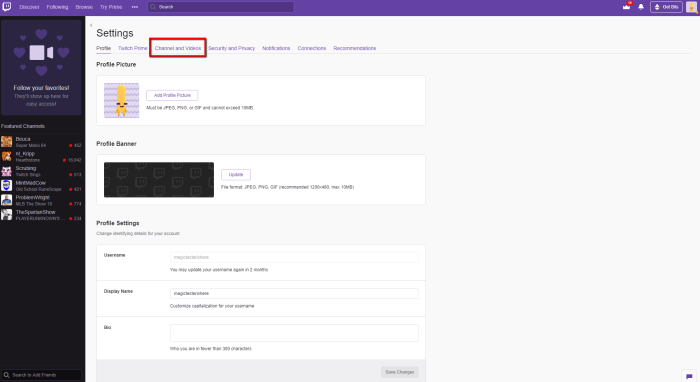
To upload your new banner, first log in to your Twitch account. Navigate to your profile page and locate the “Edit Profile” or similar option. You’ll find a section dedicated to your banner image. Click on the existing banner (or the upload area if you haven’t set one yet) to initiate the upload process. Select your optimized banner image file from your computer’s file explorer and click “Upload” or the equivalent button.
Twitch will then process the upload, and your new banner should be visible immediately. Remember to save your changes.
Optimizing Banner Images for Fast Loading Times
Fast loading times are crucial for a positive user experience. A slow-loading banner can frustrate viewers and negatively impact your channel’s overall appeal. To optimize your banner, aim for a file size under 1MB. Larger files significantly increase loading times. Use appropriate compression techniques without sacrificing too much image quality.
Consider using tools like TinyPNG or similar online services to compress your image without noticeable loss of quality. Also, ensure your image dimensions are within Twitch’s specified parameters to avoid distortion or cropping.
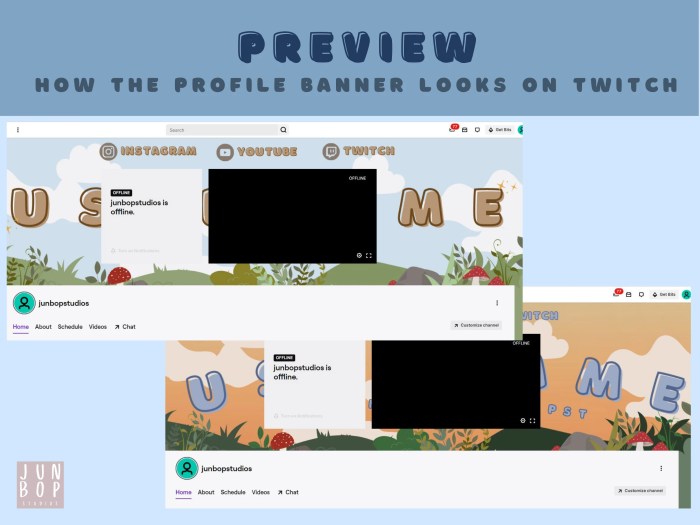
Checking Banner Appearance Across Devices and Browsers
After uploading, it’s essential to check your banner’s appearance across different devices (desktops, laptops, tablets, and mobile phones) and browsers (Chrome, Firefox, Safari, Edge, etc.). Inconsistencies can arise due to varying screen resolutions and browser rendering engines. The best way to do this is to open your Twitch profile in several different browsers and on various devices. Pay close attention to how the banner is displayed on each platform to ensure it’s consistently visually appealing and readable.
If you notice any issues, you may need to adjust your image or try a different file format.
Comparison of File Formats for Twitch Banners
Choosing the right file format is important for balancing image quality and file size. Here’s a comparison:
| File Format | Pros | Cons | Suitable for Twitch Banners? |
|---|---|---|---|
| JPG (JPEG) | Smaller file size, good for photographs | Can lose some detail during compression | Good for photographic banners; acceptable if compression is carefully managed. |
| PNG | Supports lossless compression, ideal for graphics with sharp lines and text | Larger file size than JPG | Excellent for banners with text or sharp graphics, but requires careful optimization for file size. |
| GIF | Supports animation | Large file sizes, generally not recommended for banners | Generally not recommended due to file size limitations and potential for distraction. |
Troubleshooting Common Upload Issues
Occasionally, you might encounter problems uploading your banner. Common issues include exceeding file size limits, incorrect file format, or server-side problems. If your upload fails, double-check the file size and format, ensuring they meet Twitch’s specifications. If the problem persists, try uploading a smaller, simpler version of your banner. If the issue remains, it’s likely a temporary server problem.
Try again later or contact Twitch support for assistance.
Last Point
Creating a professional Twitch banner is key to establishing a strong online presence. By following the steps Artikeld in this guide, you’ve equipped yourself with the knowledge and skills to design, optimize, and upload a banner that not only enhances your channel’s aesthetics but also contributes to its overall success. Remember, a well-designed banner is an investment in your brand and a crucial element of attracting and retaining viewers.
Go forth and create a banner that truly reflects your unique style and captivates your audience!