Securing your devices with biometric authentication—fingerprint or facial recognition—offers a convenient and increasingly secure alternative to traditional passwords. This guide provides a comprehensive walkthrough of how to enable and manage these settings on various devices, covering smartphones, laptops, and desktops. We’ll explore the setup process for different operating systems, delve into the security measures protecting your biometric data, and address common troubleshooting issues.
Learn how to optimize your device security with this practical guide.
From initial enrollment to resolving authentication failures, we will equip you with the knowledge and steps to seamlessly integrate biometric authentication into your daily digital life. Understanding the nuances of each operating system and the security protocols in place is crucial for maximizing the benefits and minimizing potential risks. This guide aims to empower you to take control of your device security with confidence.
Enabling Biometric Authentication
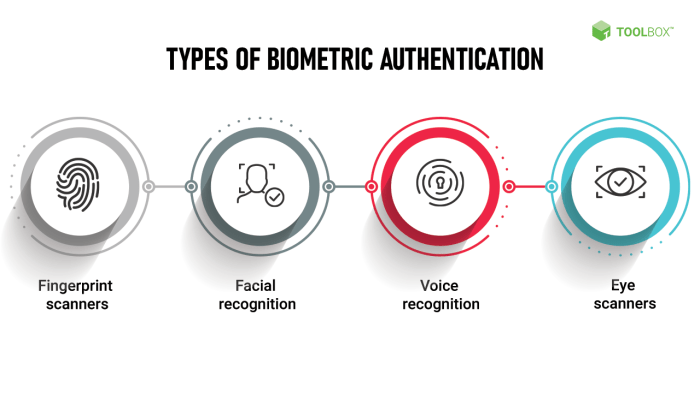
Biometric authentication, using fingerprints or facial recognition, offers a convenient and secure alternative to traditional password-based logins. This section details the steps involved in setting up and using these methods on various devices. Remember that the exact steps may vary slightly depending on your device’s manufacturer and operating system version.
Enabling Fingerprint Authentication on a Smartphone
Enabling fingerprint authentication on a smartphone typically involves navigating to the device’s security settings. First, you’ll need to locate the “Security” or “Biometrics and security” section in your phone’s settings menu, usually represented by a shield or lock icon. Within this section, you should find an option for “Fingerprint” or a similar designation. Selecting this option will initiate the fingerprint enrollment process.
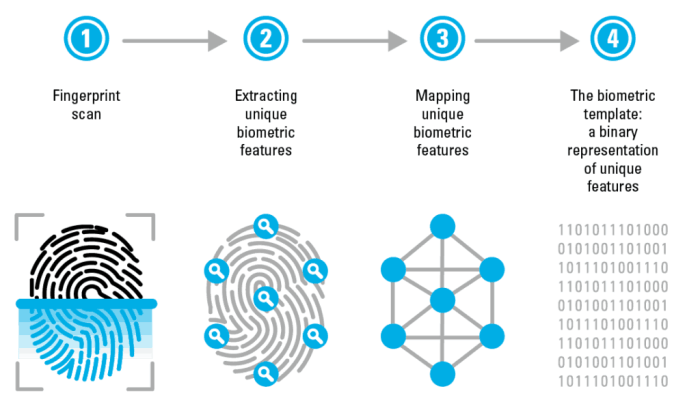
The phone will then guide you through a series of steps, prompting you to repeatedly scan your finger from different angles to create a comprehensive fingerprint profile. A screenshot of this process would show a screen displaying a circular or square area where the user places their finger, often with an animation or progress bar indicating the scanning process.
Once the fingerprint is registered, you can choose to use it for app unlocks, device unlocking, or both. A successful registration would be indicated by a confirmation message or a checkmark.
Setting Up Face Recognition on a Laptop or Desktop Computer
Setting up face recognition on a laptop or desktop computer differs slightly depending on the operating system. The following table Artikels the process for Windows and macOS.
| Step Number | Windows Action | macOS Action | Notes |
|---|---|---|---|
| 1 | Open Windows Settings (search for “settings”). | Open System Preferences (usually found in the dock). | Both actions access the main settings menu of their respective operating systems. |
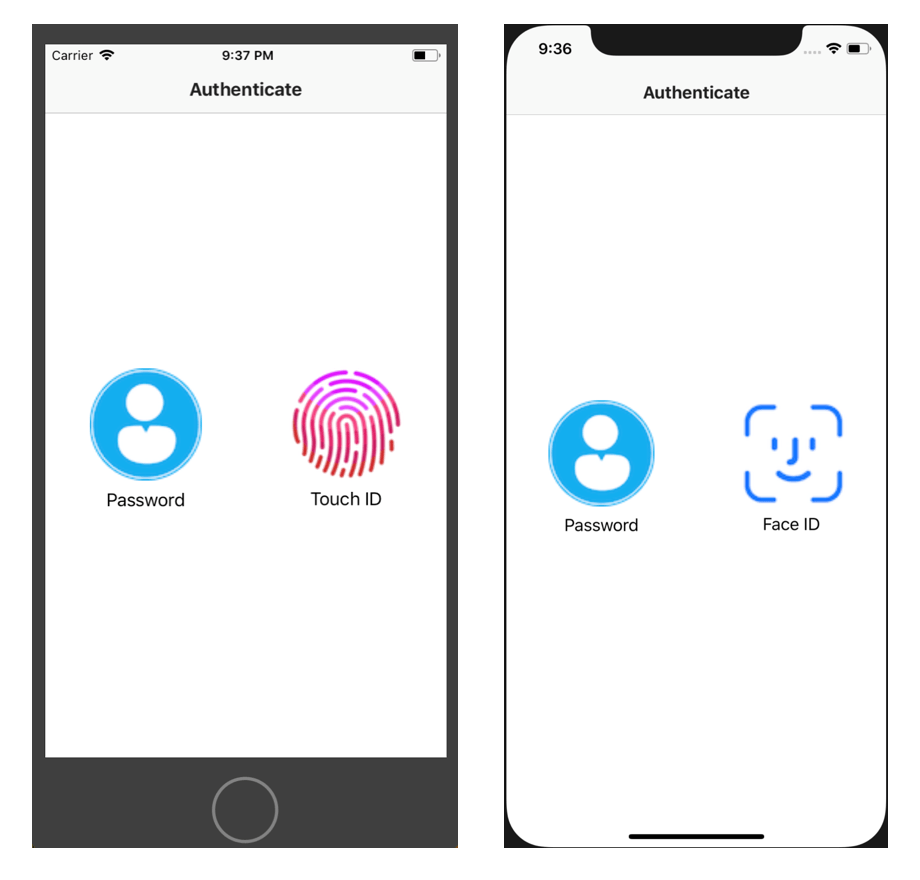
| 2 | Navigate to “Accounts” then “Sign-in options”. | Navigate to “Security & Privacy” and then select “Face ID & Passcode”. | The specific location of security settings may vary slightly depending on the Windows version and macOS version. |
| 3 | Select “Windows Hello Face” and follow the on-screen instructions. | Click “Turn On Face ID” and follow the on-screen instructions. | This will involve calibrating the camera to recognize your face. You’ll likely be prompted to move your head in various directions to ensure a complete profile is created. |
| 4 | Set up a PIN or password as a backup. | Set up a PIN or password as a backup. | This is crucial in case face recognition fails. |
Comparison of Fingerprint and Face Recognition Setup
The setup processes for fingerprint and face recognition, while both aiming for biometric authentication, have key differences and similarities.
The following points highlight the key distinctions and commonalities:
- Setup Time: Fingerprint registration generally requires less time than face recognition setup, as it involves fewer steps and calibration processes.
- Accuracy: Both methods generally offer high accuracy, though face recognition can be affected by lighting conditions, facial hair changes, or the use of accessories like glasses.
- Hardware Requirements: Fingerprint authentication requires a fingerprint sensor, typically embedded in the device. Face recognition requires a camera with sufficient resolution and infrared capabilities for accurate recognition in various lighting conditions.
- Convenience: Face recognition is often perceived as more convenient, as it doesn’t require physical contact with the device.
- Security: Both methods offer comparable security levels when properly configured, though vulnerabilities exist in both technologies.
Managing Biometric Data and Security
Biometric authentication, while convenient, relies on sensitive personal data. Understanding the security measures in place to protect this data is crucial for maintaining your privacy and online security. This section will explore the security features of various operating systems and provide best practices for managing your biometric information.
Different operating systems employ varying levels of security to protect your biometric data. This protection often involves hardware-based security elements, encryption, and secure storage mechanisms. However, the specific implementations differ, leading to variations in the overall security posture.
Biometric Data Security Comparison Across Platforms
The table below compares the security features implemented by Android, iOS, and Windows for biometric data. Note that specific implementations can vary depending on the device manufacturer and operating system version.
| Feature | Android | iOS | Windows |
|---|---|---|---|
| Hardware Security Module (HSM) | Generally present in modern devices, providing secure storage and processing of biometric data. | Present in all devices, a key component of the Secure Enclave. | Present in many devices, offering a dedicated secure environment for biometric data. |
| Encryption | Biometric data is typically encrypted both in transit and at rest. | Data is encrypted using strong encryption algorithms within the Secure Enclave. | Uses strong encryption to protect biometric data. |
| Secure Storage | Data is stored in a secure location, often isolated from the main operating system. | Stored within the Secure Enclave, a physically isolated and protected area of the processor. | Stored in a secure, isolated area, often leveraging the TPM (Trusted Platform Module). |
| Data Limiting | Access to biometric data is strictly controlled and limited to authorized system components. | Access is heavily restricted, only permitted by authorized system components and apps. | Access control mechanisms limit access to authorized applications and system components. |
Fingerprint and Facial Scan Enrollment and Deletion Process
The following flowchart illustrates the typical steps involved in enrolling and deleting a fingerprint or facial scan. The exact steps may vary slightly depending on the device and operating system.
Flowchart:
Enrollment: Start -> Access Biometric Settings -> Select Enrollment Option (Fingerprint/Face) -> Follow On-Screen Prompts (multiple scans may be required) -> Confirmation -> End
Deletion: Start -> Access Biometric Settings -> Select Delete Option (Fingerprint/Face) -> Confirmation (may require password/PIN verification) -> Deletion Confirmation -> End
Best Practices for Maintaining Biometric Authentication Security
While biometric authentication offers convenience, it’s crucial to complement it with strong security practices to mitigate potential risks. This includes robust password management and overall device security.
- Strong Passwords/PINs: Use strong, unique passwords or PINs for your device and accounts. This serves as a fallback mechanism if biometric authentication fails.
- Regular Software Updates: Keep your operating system and apps updated to benefit from the latest security patches and improvements.
- Screen Lock: Always use a screen lock (PIN, password, or pattern) in addition to biometric authentication for enhanced security.
- Device Security: Use antivirus software and be cautious about downloading apps from untrusted sources. Enable features like automatic updates and malware protection.
- Biometric Data Limits: Avoid enrolling multiple fingerprints or facial scans unless absolutely necessary. This minimizes the potential impact of a compromise.
- Beware of Phishing: Be vigilant against phishing attempts that may try to trick you into revealing your biometric data or other sensitive information.
Troubleshooting Biometric Authentication Issues
Biometric authentication, while convenient, can sometimes present challenges. Understanding common problems and their solutions can significantly improve your user experience and security. This section Artikels typical issues encountered with fingerprint and face recognition, providing troubleshooting steps for various operating systems.
Common Biometric Authentication Problems
Biometric authentication, while generally reliable, can be affected by several factors. The following table summarizes common problems, their potential causes, and recommended solutions.
| Problem | Possible Causes | Solutions |
|---|---|---|
| Fingerprint not recognized | Dirty or wet sensor; finger injury; insufficient finger surface area registered; incorrect finger placement; software glitch. | Clean the sensor; ensure your finger is dry and free from cuts or abrasions; re-register your fingerprint; try different fingers; restart your device; check for software updates. |
| Face not recognized | Changes in appearance (e.g., new glasses, facial hair); insufficient lighting; obstructions (e.g., sunglasses, hats); incorrect positioning; software glitch; camera malfunction. | Ensure adequate lighting; remove obstructions; reposition yourself according to on-screen instructions; re-register your facial scan; restart your device; check for software updates; check if your device’s front camera is functioning correctly. |
| Biometric authentication consistently fails | Incorrect setup; damaged sensor; software conflict; outdated operating system. | Review setup instructions carefully; check for physical damage to the sensor; uninstall and reinstall biometric software; update your operating system. |
| Slow or unresponsive biometric reader | Software issues; hardware malfunction; insufficient processing power. | Restart your device; check for software updates; consider upgrading your device if performance is consistently poor. |
Resetting Biometric Settings and Re-enrollment
If troubleshooting steps fail to resolve biometric authentication issues, resetting biometric settings and re-enrolling your fingerprints or facial scan may be necessary. The process varies slightly depending on your operating system.
Resetting and Re-enrolling Fingerprints on Android
To reset and re-enroll fingerprints on most Android devices, navigate to your device’s settings, usually found by pulling down the notification shade or tapping a settings icon. Then, find the “Biometrics and security” or similar section. Locate “Fingerprint” or a related option. There will be an option to delete or remove all registered fingerprints. After deleting, follow the on-screen prompts to re-register your fingerprints.
This usually involves repeatedly placing your finger on the sensor until the registration is complete.
Resetting and Re-enrolling Facial Scans on iOS
On iOS devices, access “Face ID & Passcode” within the “Settings” app. You should find an option to “Reset Face ID.” After resetting, follow the prompts to re-register your face. This involves presenting your face to the device from different angles as instructed on-screen.
Resetting and Re-enrolling Fingerprints on Windows
In Windows, open the “Settings” app, and go to “Accounts,” then “Sign-in options.” Under “Windows Hello,” locate “Fingerprint” and select “Remove.” After removal, follow the prompts to add your fingerprint again using the Windows Hello setup wizard.
Resetting and Re-enrolling Facial Scans on macOS
On macOS, access “System Preferences,” then “Security & Privacy.” Select the “Touch ID” tab (if applicable). There will be an option to delete enrolled fingerprints. To reset facial recognition (if available on your model), the process may be similar, look for a “Face ID” or similar option under “Security & Privacy” and follow the instructions for removal and re-enrollment.
Final Summary
Mastering biometric authentication enhances both convenience and security. By understanding the setup process, managing your biometric data effectively, and knowing how to troubleshoot common problems, you can confidently leverage this technology for enhanced protection. Remember to prioritize strong password management and overall device security practices for a truly robust security posture. This guide provides a solid foundation for navigating the world of biometric security and optimizing your digital safety.