Capturing high-definition video is paramount for creating professional-looking content, whether for personal memories or professional projects. Understanding how to adjust your camera and software settings is key to achieving crisp, clear footage. This guide will walk you through the process, covering everything from understanding video resolution to mastering post-production techniques.
From choosing the right resolution (720p, 1080p, 4K) and optimizing settings like frame rate and bitrate, to leveraging the power of video editing software, we’ll equip you with the knowledge to significantly enhance your video quality. We’ll also explore how lighting and other factors impact your final result, ensuring your videos look their absolute best.
Understanding Video Resolution and its Impact on Quality
Choosing the right video resolution is crucial for achieving the desired balance between video quality and file size. Higher resolutions offer sharper images and more detail, but they come at the cost of significantly larger file sizes, requiring more storage space and potentially slower upload/download times. Understanding the differences between various resolutions will help you make informed decisions when recording your videos.Video resolution refers to the number of pixels that make up the image.
Pixels are tiny squares of color, and the more pixels you have, the more detail you can see. This is expressed as a width x height measurement, often followed by a “p” (progressive scan) designation.
Video Resolution Comparison
Different resolutions offer varying levels of detail and clarity. 720p (1280 x 720 pixels) is considered standard definition, providing acceptable quality for most viewing purposes. 1080p (1920 x 1080 pixels), also known as Full HD, offers significantly improved clarity and detail. 4K (3840 x 2160 pixels) is four times the resolution of 1080p, resulting in incredibly sharp and detailed images, perfect for large screens and professional applications.
However, 4K videos require considerably more storage space and processing power. Imagine viewing a bustling city street scene: in 720p, individual faces might be blurry, while in 1080p, you can distinguish facial features more clearly. In 4K, you could potentially even make out the text on a street sign far in the background.
Advantages and Disadvantages of Different Resolutions
The choice of resolution involves trade-offs. Higher resolutions offer superior visual quality but result in larger file sizes, demanding more storage and bandwidth. Lower resolutions are more manageable in terms of file size and processing but sacrifice visual detail.For instance, recording a high-action sports event in 4K might capture every detail of the athletes’ movements, but the resulting file will be enormous.
On the other hand, recording a simple vlog in 720p will result in a smaller file, easier to upload and share, though some detail might be lost.
Visual Quality Examples Across Resolutions
Let’s consider a landscape video. A 720p version might show a general view of the mountains and valley, but fine details like individual trees or textures in the rocks might be less distinct. A 1080p version will reveal more detail, allowing you to see the individual leaves on the trees and the intricate patterns in the rocks. Finally, a 4K video will offer an incredibly immersive experience, showcasing the vastness of the landscape with exceptional clarity, even showing small details like individual blades of grass.
Common Video Resolutions and File Sizes
The actual file size depends on various factors including video length, codec, and bitrate. The following table provides approximate typical file sizes for a 1-minute video clip.
| Resolution | Pixel Dimensions | Approximate File Size (1 minute) | Typical Use Cases |
|---|---|---|---|
| 720p (HD) | 1280 x 720 | 50-100 MB | Web videos, social media, casual recording |
| 1080p (Full HD) | 1920 x 1080 | 100-200 MB | High-quality web videos, professional projects, Blu-ray discs |
| 4K (Ultra HD) | 3840 x 2160 | 300-600 MB | Large screen viewing, professional filmmaking, archival purposes |
Adjusting Camera Settings for High-Definition Recording
Achieving high-definition video requires more than just selecting a high resolution; it involves a careful optimization of several camera settings. Understanding these settings and their interplay is crucial for capturing professional-looking footage. This section will guide you through adjusting your camera’s settings to maximize video quality.
Changing Video Resolution Settings
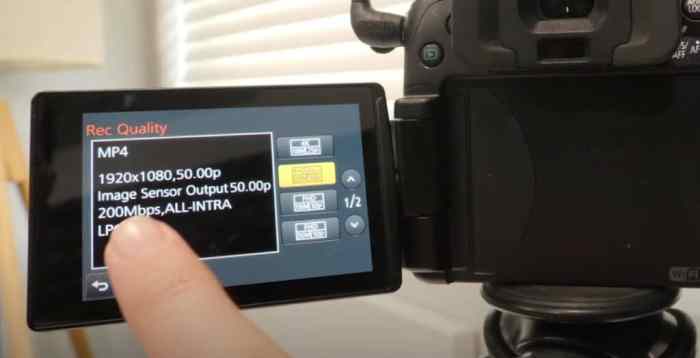
Different cameras have different interfaces, but the core process of changing video resolution remains similar. Generally, you’ll find this setting within the camera’s menu system, often under a section labeled “Video,” “Movie,” or “Recording.” Here’s a breakdown for a few popular brands:
- Canon: Navigate to the menu, usually accessed via a dedicated button. Look for options like “Movie Rec. Size” or similar. You’ll typically find options like 1080p (Full HD), 4K UHD, and potentially lower resolutions. Select your desired resolution.
- Nikon: Similar to Canon, access the menu system. Look for settings related to “Movie,” “Video,” or “Movie Settings.” The resolution options will be clearly labeled, such as “1920 x 1080 (Full HD)” or “3840 x 2160 (4K UHD).” Choose your preferred setting.
- Sony: Sony cameras often have a dedicated video recording mode. Within this mode, the resolution settings are usually easily accessible. Look for options like “Resolution” or “Recording Size.” Select your desired resolution from the list provided.
Remember to consult your camera’s manual for precise instructions as menu layouts vary.
Optimizing Other Camera Settings
Resolution is only one piece of the puzzle. Other settings significantly influence video quality.
- Frame Rate: This determines the number of frames displayed per second (fps). Higher frame rates (e.g., 60fps) result in smoother, more fluid motion, particularly useful for action scenes. Common options include 24fps (cinematic look), 30fps (standard), and 60fps (smooth action).
- Bitrate: This measures the amount of data used per second of video. A higher bitrate results in a higher-quality video with finer detail and less compression artifacts, but it requires more storage space. Lower bitrates compress the video more, saving space but potentially reducing quality.
- ISO: This setting controls the camera’s sensitivity to light. Lower ISO values (e.g., ISO 100) are best in bright conditions for cleaner images with less noise. Higher ISO values (e.g., ISO 3200) are needed in low light but introduce more digital noise (grain).
Finding the optimal balance between these settings depends on the shooting conditions and your storage capacity. Experiment to find the best combination for your needs.
The Impact of Lighting and Corresponding Camera Adjustments
Lighting is paramount for high-quality video. Insufficient light leads to grainy footage and poor color reproduction. Conversely, excessive light can cause overexposure.
- Low Light Conditions: Increase the ISO setting cautiously to compensate for the lack of light. However, be mindful of the increased noise. Consider using a tripod to minimize camera shake, as slower shutter speeds are often necessary in low light.
- Bright Light Conditions: Reduce the ISO to its lowest setting to avoid overexposure. You may need to adjust the aperture (if your camera allows) to control the amount of light entering the lens.
Always prioritize good lighting. If possible, use external lighting sources like LED panels or softboxes to enhance your video quality.
Adjusting Camera Settings Flowchart
A flowchart would visually represent the steps involved:[Imagine a flowchart here. The flowchart would start with “Select Camera Mode,” branching to “Video Mode.” Then, it would proceed to “Adjust Resolution,” “Adjust Frame Rate,” “Adjust Bitrate,” “Adjust ISO,” and finally “Review and Record.” Each step would have decision points (e.g., Is the lighting sufficient? If no, adjust ISO). The final step would involve a loop back to “Adjust Settings” if necessary, before finally reaching “Record Video.”]
Software Settings and Post-Production Techniques
While capturing high-definition footage is crucial, post-production plays a vital role in maximizing video quality and resolution. Video editing software offers a range of tools to enhance your recordings, compensating for minor imperfections and even improving the overall resolution. Understanding how to leverage these tools is essential for achieving professional-looking results.Software like Adobe Premiere Pro, Final Cut Pro, and DaVinci Resolve offer sophisticated features for manipulating video resolution and quality.
These programs allow for adjustments to color grading, sharpening, noise reduction, and other enhancements that can significantly impact the final product’s perceived resolution. Furthermore, some advanced software even offers upscaling capabilities, which can artificially increase the resolution of your footage, although this process isn’t without limitations.
Video Editing Software Capabilities
Adobe Premiere Pro, a widely used professional video editing software, provides a robust suite of tools for enhancing video quality. Its Lumetri Color panel offers precise color correction and grading, allowing for adjustments that can significantly improve the perceived sharpness and clarity of a video. Similarly, its sharpening tools can subtly enhance detail, while noise reduction tools can minimize graininess, particularly noticeable in low-light recordings.
Premiere Pro also supports various high-resolution output formats and codecs, ensuring that the final exported video maintains its quality. Final Cut Pro, Apple’s professional video editing software, offers comparable features, including advanced color correction, noise reduction, and sharpening tools. Its magnetic timeline and intuitive interface make it user-friendly, while still providing professional-level control over video quality. DaVinci Resolve, a powerful and free option, is known for its color grading capabilities, considered by many to be industry-leading.
Its extensive features include advanced noise reduction, sharpening, and even AI-powered upscaling options.
Optimizing Video Settings within Video Editing Software
Optimizing video settings within editing software requires a careful balance between quality and file size. Choosing the correct resolution and frame rate is paramount. Working with the native resolution of your source footage is generally recommended to avoid unnecessary scaling and potential quality loss. For example, if you shot in 1080p, editing at 1080p preserves the original detail.
However, if you need to scale down for compatibility, do so carefully, ensuring you use high-quality scaling algorithms within the software. Furthermore, settings like bitrate significantly impact the final video quality. A higher bitrate generally results in a better-quality video with more detail but increases file size. Experimentation is key to finding the optimal balance for your specific needs.
Finally, always preview your edits at full resolution before exporting to ensure the final product meets your expectations.
Best Practices for Exporting High-Definition Videos
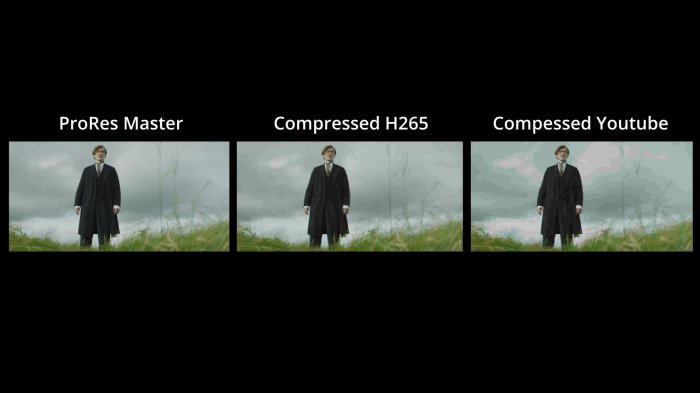
Before exporting, choose the appropriate file format and codec to maintain the highest possible quality. For professional-grade videos, the H.264 codec (MP4 container) is a widely accepted standard, offering a good balance between quality and compression. However, for archival purposes or situations demanding the highest quality, the ProRes codec (MOV container) is preferred, though resulting in significantly larger file sizes.
When exporting, always ensure your settings match the target platform’s requirements. For instance, uploading to YouTube might require specific resolutions and codecs for optimal playback. Remember to render your video at the highest possible quality setting within your chosen export format to preserve all the enhancements made during the editing process. Consider using a high bitrate setting during the export to avoid significant compression artifacts.
Finally, always test the exported video on the target device or platform to ensure it plays correctly and looks as intended.
Closing Summary
By mastering the art of video settings optimization, you can elevate your video production to a new level. Remember that the journey to high-definition video involves careful consideration of your camera settings, lighting conditions, and post-production techniques. With practice and the knowledge gained here, you’ll be recording stunning, high-quality videos in no time. Embrace the possibilities and start creating breathtaking visuals!